All posts by admin

Common Problems of Epson Printers with Windows 10

Is your Epson Printer not working or has suddenly stopped while printing very important documents? Well, printer error while working is a common cause. While usually sometimes there might external factors that created this issue like no ink or paper, improper connection, or network issues, sometimes there might also be some technical error that caused your printer to stop working. Here we will discuss all the factors along with their solution in order to fix your Epson printer.

Various Factors which Caused your Epson Printer to Stop Working

Some of the possible causes due to which your Epson printer is not working are listed below:

  • No Proper connection
  • The issue with the printer setting, the printer is not set as default.
  • Technical Issue: Printer driver not updated
  • External issue: No paper, ink, or connection with computer or electricity
  • Printer Not Scanning
  • Printing jams caused by so much paper
  • Not printing from mobile.
  • Wifi Printing issue, cloud print for android devices,
  • Faded Colours (Low ink)
  • Blank sheet appearing after every paper is printing

How to Fix Your Epson Printer

Before you call out for assistance to fix your Epson printer, you can take the following given measures and check if your Epson printer has started working again:

Fix all the Connections to Your Printer

  • Check if all the cables are properly connected. Most importantly check if the electricity cable and wires that are connecting the computer to the printer are properly inserted.
  • Plugin all the cables and ports again
  • Turn on the power switch.
  • Give the print command from your System to check if your Epson printer is working correctly or not.

Set as Default Printer

The common cause for various issues while printing is that your Epson Printer is not set to the default printer. Hence the command you have given for printing will not be received by the printer. In order to fix your Epson printer by setting it as the Default printer, follow the given steps:

  • Open your desktop/laptop. Go to the control panel.
  • In the control panel, select “Device and Printers”
  • Look out for the Epson printer which you have installed for your system.
  • Right-click on it and choose “Set as Default Printer”.
  • Now try to print again with Epson Printer.

Update the Device Driver

If the drivers of the Epson printer are not updated then it might create trouble while giving commands. Usually, drivers are self-installing, so all you need to do is remove the printer and add it again to your system. The new printer on your will be consisting of all the updated drivers. In order to update the drivers of the Epson printer manually in your system, follow the given steps:

Add Epson Printer to your Device

  1. Click the windows button and search for setting.
  2. Click Device and Printer and Scanner.
  3. Now click on Add Printer and Scanner.
  4. Select the way how you want to add your printer (Add Bluetooth, wireless, or local discoverable printer or add the printer with manual settings).
  5. Install the printer.

Update your Device Epson Printer Driver

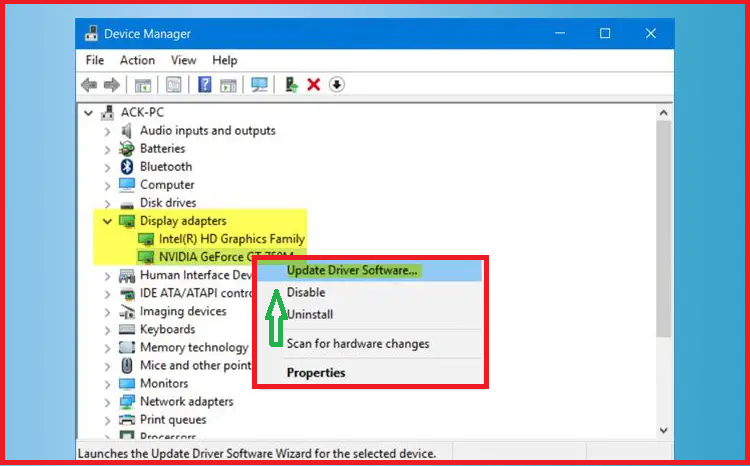
  • Open the device manager.
  • Under the device manager, look out for the Printer.
  • Right-click on the device and select “Update Printer”.
  • In the next appearing window, select “Search automatically for the updated driver software”
  • The driver will be updated automatically.

Download the Epson Printer Driver only From the Official Website.

Sometimes all you need to do is to install your printer properly. For that, you need to visit the official website of Epson. Enter your device name and the operating system of your desktop. The updated driver will be available on the official website of the Epson printer. Download and install it.

Reset the Printer Spooler

Many of the internal issues which can stop your printer can be managed just by resetting the spooler. In order to reset the Epson Printer Spooler, follow the given steps:

  • Press “Window + R” and type “service.msc”.
  • On the new appeared window, find “printer spooler” and click enter.
  • Choose “Startup type” and set it as “Automatic”.
  • Choose “service status” and select it as “running”. Click OK.
  • Now Press “Window+R”  and type “spool”.
  • Select “Printers”
  • Delete all the files.

Run Windows 10 Troubleshooter to Fix the Epson Printer

Another method to fix Epson Printer is by running troubleshooting. Lookout for the below steps in order to run troubleshoot:

  1. Open settings and “Update and Security” and then “troubleshoot”
  2. Click “Get up and running” and then “printer”.
  3. Click “Run the troubleshooter”.

Other Solutions to Fix your Epson Printer

  • Cancel all printing queues: Sometimes, due to so many queues in pages, sometimes the printer stops working or so many pages in the queue can create an external problem in the printer.
  • Restart your printer and check again: Maybe it is not the printer, it might be the system. Restart your system again and check for the printer.
  • Use another program to print the document: Maybe the application/program from which you are giving the command might have some issue, not your printer. For that close and open the program again or uninstall and reinstall it again.
Conclusion:

From the above information, we think that taking the given measures may surely fix your Epson Printer issues. While one can easily detect any external issue like shortage of ink or paper or connectivity issues. However, not everybody has an idea to resolve the technical glitches in the system. We hope from the above given step-by-step solutions, you can easily understand and fix your Epson Printer.

How to Fix Outlook 2016 Crashes on Launch?

Is your Outlook 2016 Crashes on Launch? Read this blog to learn multiple ways to fix it. Microsoft Outlook is a famous e-mail client that people use for both personal and professional use. It is a part of the Microsoft 365 products Family and offers various other services as well that, include calendering, contacts, and tasks. However, sometimes, Outlook user faces issues while working on it. The Outlook freezes or crashes on opening. But the good point is that you can fix this error by following basic troubleshooting.

Are you in search of instant help to fix your Outlook 2016 issues? Dial our toll free number and get in touch with the E-mail experts.

What are the Root Causes Behind Outlook freezing or Crashing?

Here we have provided the main causes that can promote the Crashing or freezing of the Outlook

  1. Some Outlook Add-in that is creating issues.
  2. Damaged Outlook Data File.
  3. Presence of Third-party Antivirus Program.
  4. Outlook Mailbox is filled.
  5. You have installed the updates recently.

What to do if Outlook 2016 Crashes on Launch?

Let’s take a look at the steps you need to follow when your Outlook 2016 is not opening properly.

  • Uninstall old add-ons for Outlook

To remove any of the add-ons present in your Outlook software, you must have to follow the given steps:

  1. Open Settings.
  2. Thereafter you have to click on System followed by Apps & Features.
  3. Now, wait for sometimes, until the list of all the installed apps shows up on your Screen.
  4. Look for any Outlook 2013 add-on available in your System, and hit on Delete.
  5. Once you delete them, restart your System again and try to open Outlook again.

Note: In case you had Outlook 2013 on your device, you might have a different add-on downloaded.

However, if, even after uninstalling add-ons, you are not able to open Outlook, try to do so in Safe Mode. You can simply press and hold Ctrl and try to launch Outlook 2016 in Safe Mode.

  • Disable hardware acceleration 

In case the previous method doesn’t work for you, then you to resolve Outlook 16 freezing error; you can Turn- off the hardware acceleration and verify if the issue is fixed.

  1. Initially, launch Outlook.
  2. Navigate to the File menu, and click on the options.
  3. Next, select the Advanced tab.
  4. Now, look for the Display section and verify the Disable hardware graphics acceleration.
  • Delete all E-mail Accounts and Re-add Them 

At times, users face this issue due to a corrupted e-mail account; thus, to resolve this issue, you can remove and re-add- your account again.

  1. Initiate the process by pressing Windows Key + S, then search for Control Panel.
  2. Next, hit on the Control Panel option
  3. After that, move to User Account, and click on Mail.
  4. In the next window, you have to select E-mail Accounts.
  5. A list of e-mails will appear on your Screen, choose the account you want to delete, and then click on Remove.
  6. Now, repeat the process for the accounts you want to remove.
  7. Next, re-add them again.
  • Check Your Antivirus 

At times, Your Outlook 2016 may crash because of the presence of an Internet Security program. There are many antiviruses that create a hindrance for you while accessing the software. Thus in such cases, you have to turn off the Antivirus software.

  • Start Outlook as Administrator

At times, Outlook 2016 freezes due to fewer Admin privileges as well. In such a scenario, try to access Outlook using Admin Privileges.

  1. Look for the Outlook Shortcut on your System.
  2. Next, you have to right-click the shortcut.
  3. Here, click on Run as Administrator from the options.

However, you need to follow this process every time you are using Outlook, thus to make this simple, you can try an Alternate way:

  • Initially, look for Outlook.
  • Next, you have to Right-click on Outlook to get various options.
  • Now from there, select the Properties tab.
  • After that, go to the Compatibility tab.
  • Then click on the Run this Program as an Administrator option.
  • At last, select Apply and hit Ok.

After this, Outlook will start with admin privileges only, and you won’t face any freezing or crashing issues.

  • Perform a BIOS Update 

If your Outlook 2016 freezes when you try to access it, then to fix this problem, you have to go for a BIOS update. Many users find that their Outlook issues get resolved instantly after updating the BIOS.

Note: Before going with the BIOS update, verify your Motherboard manual for the complete information. 

You can also check with the password and update your operating System. These options will surely work, and you will be able to rectify the issue of Outlook keeps crashing very easily.

Wrapping it up!

By following the above process, we assure you that your Outlook 2016 not working issue will be fixed. However, if you are not able to fix your issues, even after following the step, we will advise you to mail your issues to info@getcontacthelp.com. AN e-mail expert will revert you with the best solution possible.

Lock Screen in Windows 8 Shortcut

In today’s time, we all are using a smart PC/ laptop to work in our professional and personal life. Whether you want to compose a mail or even place an online grocery order, we are solely dependent on PC for carrying out the activities. But what happens when you need to go out for a quick meal or for a pee? Would you shut down your device and launch all the tabs again? Well, that might not be a solution to deal with it.

In this blog, we will enlist numerous methods to lock the screen in Windows 8 shortcut. If you need to know any more quick shortcuts in windows PC, you can contact our experts.

Different Methods to Lock Screen in Windows 8

Let’s take a look at the different methods about how you can lock your device screen on the windows 8 operating system;

Method 1. “Windows + L” Keys

One of the easiest methods to lock your device is by pressing a few keys. Yes, it’s that quick and easy. Whatever the task you are doing on your PC, you must press the “Windows + L” keys on your device to lock the PC.

It is the most used device locking method among users, and it protects your device from getting accessed by anyone.

Method 2. Hitting the “Ctrl+Alt+Delete” Keys Together

Another shortcut method for performing a quick windows 8 lock screen. Just hit the “Ctrl + Alt + Delete” keys together on your PC keyboard.

Thereon, a mini pop-up window will open on your screen. Here, you will be able to see 4-5 shortcut options. Click on the “Lock” option, and that’s how quick it is.

You have successfully locked your device. Now, you have to re-enter the login password to access your device.

Method 3. Windows 8 Lock Screen Through Username

The following shortcut method through which you can lock your windows 8 PC is via username settings.

  • Firstly, click on the windows start icon on your PC.
  • Thereon, hit the “Username,” and as the username, drop-down settings appear, then hit the “Lock” option.

Your PC’s screen is now locked, and you will be asked to provide the login password to unlock your PC.

Method 4. Lock PC Through Device Settings

  • Firstly, do a right click on the free space available on the desktop screen.
  • After that, click on the “Personalise” option and select the “Screen Saver” option.
  • Moving ahead, the screen saver settings window will be open on your device.
  • Here, you have to select the “Screen Saver” pattern through the drop-down list.
  • Select the waiting time, then check-mark the “On resume, display log-on screen” option.
  • After that, hit the “OK” option.

If you don’t use your device for the duration set in the waiting time settings, then your device will be automatically locked. You will be able to use your device by providing the password.

Method 5. Lock Your PC With Sleep Mode

Another shortcut that can work for you to lock your device is switching your device to sleep mode. Here are the steps that you can execute to lock your PC with sleep mode;

  • Firstly, click on the “Windows” icon which is available at the bottom of the taskbar.
  • Choose “Shut down or sign out” from the following menu..
  • At last, you have to select the “Sleep” option.

Now, you can easily wake up your device by hitting any key on the keyboard. You will be asked to provide the login password again to unlock your PC.

Ending Note

Above, we have listed five methods that you can perform to lock the screen in windows 8 device. If you want to learn more about any other shortcuts in any of the windows operating systems, you can contact our experts via mail at info@getcontacthelp.com or Windows 8 Support. Our experts are available 24/7 around the clock to help you fix windows issues.

Travel Trends For 2023

While the pandemic compels everyone to stay home, their burning lust scratches them from the inside to go outside that boundary. Everyone is now too frustrated and has the urge to take a breath by residing in the lap of nature. Each individual wants to feel alive again and enact like a jumping jack to explore the places they dreamt of in this period.

Now that travel trends for 2022 is gone and 2023 is approaching, most people have already planned to visit some place. It is not wrong to say that the Traveling season is coming.

However, travel is finally back, loaded with many amusing trends which will probably be witnessed in 2023. You can already smell that certain trends are slowly seeding up and hot to trot to flow in the blood of the veins like adrenalin. Let’s know about those trends in detail so you can also partake in those trends. 

Getaways Inclusive of Wellness are a Must

People want wellness to be on the driver set that takes them to their end of the line. Half of the wanderers are interested in gaining an experience full of mindfulness and peace. At the same time, the other half aims to achieve the retreats stacked with spirituality. This niche in the traveling industry comprises yoga, spiritual sojourn, and spa. 

Indubitably, it is true that people come back from a trip exhausted or tired and crave sleep to extinguish their lethargy. Though opting for a trip for pleasure will allow you to come refreshed like a detoxicated person regarding the tripartite confluence of Soul, mind, and body. 

This impacts the increment in the ratio of solo travelers compared to “family” or “couples” travelers. Roaming alone grants you to reside in the domain of solitude. Without any distractions, you can fuse with the tranquility of nature to calm yourself to be a better version of yourself. 

To Be in That Vibe of the Nostalgia

A survey showed that most people planning to have their trip this upcoming year want to be nostalgic about it. This desire surely trends as most people can’t live as they used to. So they dive deep down into themselves to relive the memories they possess but in an enhanced way. 

Those adults mainly want to spend time with their families and friends as this is the first time they have connected with them. It will surely become a new tradition that this generation of travel enthusiasts will start in the forthcoming year. 

Travel Trends to Find your Next Workstation

Covid has engraved in people’s minds a fear that yanks them from fulfilling their prolonged vacations. Even most of the world opens its boundaries and welcomes the wanders with open arms to let them eliminate their hunger for traveling. So, the majority of the masses aim to visit only domestically. 

While traveling domestically, they can experience the vibrancy of the culture and know the deeply embedded roots of their country. It is a great opportunity for the adults to stay and work from there, which is quite fascinating. Certainly, it’ll increase the productivity of the task you are engaging in.

A long stay at a domestic spot is similar to a short International Trip as they cost the same. Hence no hesitation prevailed in exploring nearby domestic venues. Working from another place than the home is not a trend at all, and I believe that it has become the new normal in every traveler’s life.

While working, you can scratch yourself to know who you are, opening the door to getting more socialized. Whoever knows, you may find a person for the rest of your life. Certainly, it becomes quite interesting to work while residing by the side of the window of a room with a view of a flowing river.

Imagine when it rains, and you have a coffee mug in your hand while managing your work on your laptop; your mind will automatically give the output you can’t give while under pressure. 

Inflation in the Search for Pet-friendly Spots

 It is really hard to leave the pet alone at home while being a father or mother of the pet. And if you do so, your mind wouldn’t go with you on the vacation as you always think of your pet. Many resorts or hotels are pet-friendly, so it is a golden opportunity to grab it. Certainly, you don’t want to detach your pet from you even for a second. 

People in the pandemic don’t have anyone with them; most of them die, and others are stuck alone somewhere; the only reason they get attached is their pets. Their pets hold them together and encourage them to pass this phase. And now they all have a relationship that is indeed unbreakable.

A study shows that people with pets will increase massively in 2022. So it surely hit the bell to declare itself as a trend among travelers in 2023. 

List of Offbeat Destinations Seeded in the Minds

It’s not a big shock to spot many people in a nature-enchanted place. As they have done with the usage of devices, now they all want to lie down under the sky bed full of glittering stars. And dip their feet in the river while sitting on a bank. 

People nowadays look for a place that is not that exciting but worth visiting. They want some alone time after being surrounded by so many people. Offbeat is the new trend that will surely be witnessed this upcoming year. 

Related Page: Change my Travel Date on American Airlines

In Essence

All travelers want to spend some time alone with nature which they missed out on in this long period as a medical emergency binds them to the four walls. The above-given trends are certainly the ones that are coming in the stream and ready to get followed by everyone else. 

Webroot Secureanywhere Download with Keycode

Want to learn how to Download and install webroot SecureAnywhere with keycode? Read this blog. 

Webroot is a cybersecurity software that protects different devices, including Windows, Mac, and mobile phones, from all malware attacks, online threats, and viruses. We are living in the online era, where the cases of cyberattacks are increasing; thus, to save our devices from any kind of cyber threat, we need Antivirus software. Webroot SecureAnywhere is a great antivirus software that is well-known for providing excellent security services for both home and business networks. It offers all the advanced features like  VPN, malware removal, anti-spyware password manager, parental control, firewall, etc.

This is the reason why a lot of people buy Webroot. However, the user face issues in completing the Download or installation process, go through this post to acquire more knowledge about the process.

Need quick assistance while downloading Webroot SecureAnywhere with keycode? Call us on our tollfree, and get professional help.

Minimum System Requirement for Downloading Webroot SecureAnywhere with Keycode

For different devices, there are different requirements that you must need to fill in before going further with the download process.
For devices having Windows Operating System:

  1. The device must be compatible with different Web Browsers, including Google Chrome, Mozilla, Microsoft Edge, Opera, Safari, Firewall, Internet Explorer, etc. 
  2. The minimum Hard Disk Required is 15 MB.
  3. Minimum RAM needs to be 128 MB.
  4. Your Internet speed must be great. 
  • Requirements of Mac devices:
  1. Supported Browsers: Apple Safari, Mozilla Firefox, and Google Chrome (With the Latest Versions)
  2. Minimum Hard Disk Required: 15 MB
  3. RAM must be 128MB or more than that.
  4. Internet speed should be smooth. 
  • For Android Devices:
  1. The operating system should be Android 4.4 or more than that.
  2. Minimum Free Disk Space: 3 MB
  3. Stable network connection. 

The Webroot SecureAnywhere with Keycode is also Available for iOS.

Points to Keep in Mind before you Downloading Webroot with keycode

Let’s look at a few points you must take care of prior to downloading Webroot SecureAnywhere with keycode:

  • Check if your device meets the minimum requirements to download the software. 
  • Check and update your Operating System, as an outdated one can create obstacles while downloading.
  • Uninstall all the other antivirus software, to eliminate interference at the time of virus detection.
  • Make sure your hard disk has enough space. However, if you encounter a space issue, delete all the junk files, cookies, cache, temporary data, etc., from your System. 
  • Provide stable and fast Network Connection.
  • Review your Webroot® SecureAnywhere Keycode; one must have a valid key to use the security software.

How to Download Webroot SecureAnywhere with Keycode?

Now that you have acquired all the information about Webroot SecureAnywhere, let’s look at the steps you need to follow to download Webroot SecureAnywhere software.
 
Note: The steps to download and install are the same for every device.

  • Initially, open your Web Browser, and navigate to the webroot.com/secure webpage.
  • Now, provide your Webroot Registered email.
  • Type or Paste the product key on the given field. 

Note: Type in case of the retail card, and paste in case of Online purchase.

  • Thereafter click on the Next option.
  • Now, from the list, you have to search for the Download option, then click on it.
  • Thereon, select the device you want to provide protection.
  • At last, download the setup on your device. 

Steps to follow to Install Webroot with Key Code

  • Open the folder where you have saved the downloaded file.
  • Now, look for Webroot Antivirus Setup
  • Thereafter, initiate the installation process by double-clicking on the Webroot Setup.
  • A new pop-up will appear on your System, where you have to select your preferred language. 
  • Select the Next option.
  1. An agreement and license page will pop up on your screen, go through it and then click on the Agree & install option.
  • Now, in the installation type, select custom installation.
  • Thereafter hit on the Add and Remove option and select Next.
  1. Now, a new pop-up will appear on your screen for the activation key, where you have to provide the Webroot Complete Key.

Note: Review the Key properly before clicking the Confirm option.

  • Once you have read everything, click on the Confirm button.

2. Thereafter, select the Finish Button, and restart your device.

  • Now, scan your device easily and efficiently. 

How to Update Webroot SecureAnywhere with Keycode?

Suppose you are facing issues with the Webroot SecureAnywhere after a few months of using it, then it means you need to update your software. Follow the given steps carefully to do so.

  • Initiate the process by installing the Webroot software in your System.
  • Thereafter, Click on the Gear icon.
  • Next, select the About SecureAnywhere tab.
  • Click on the Check for software updates.
  • Now, wait for sometime to complete the update.

Related Page: Uninstall Webroot SecureAnywhere Antivirus

Ending Note!

After trying all the described solutions, if you are still struggling with the Download of Webroot SecureAnywhere with keycode, then it might be possible that your System is having some kind of technical glitch that is an obstacle. In such a case, you need to get in touch with the professional Webroot Antivirus Team and save time in the error resolution process. Get in touch through email or live chat, and ask all your Queries.

How to Fix Internet Explorer that Keeps Crashing or Freezing?

Internet Explorer is one of the most widely used web browsers, even after Microsoft disabled it with the new Edge Browser. Users who are still using the previous version of windows below Windows 11 still prefer to work on Internet Explorer. However, while browsing the internet through explorer, users face many issues as the browser crashes or sometimes freezes, hindering their work or any other activity for which they are using the internet. To resolve the issues with explorer, people sometimes need mandatory assistance. Here we will help to fix the Internet Explorer that keeps crashing and freezing sometimes. Internet Explorer has now been permanently retired by Microsoft, with Internet Explorer 11 as the latest update available. Read the article further to know how to fix Internet Explorer Issues.

Possible Reasons why Internet Explorer Keeps Crashing

There can be plenty of causes due to why internet explorer keeps freezing or crashing while browsing the internet. Some of the common causes due to which Internet Browser keeps crashing are mentioned below:

  • Interruption by any Malware or virus in your system
  • Internet Explorer needs to be reset.
  • Use of add-ons, toolbars, and other browser objects.
  • Low memory or space in your system.
  • Hardware Acceleration or presence of any corrupt system files.

How to Resolve the Issue of Internet Explorer Keeps Freezing

The reason why Internet Explorer keeps freezing is only sometimes fixed; therefore, various measures need to be taken in order to fix the browser issues. Some of the ways through which you can stop Internet Explorer from crashing are listed below:

Reset Internet Explorer Settings

One of the most common reasons Internet explorer keeps crashing is low memory or corrupted system files. In that case, you need to reset the browser setting in your system, for which you need to follow the given steps:

  1. Launch Internet explorer in your system and choose the Tools option.
  2. In the tools, select the Internet Option. Choose the Advance Tab and select the Reset button.
  3. After that, click close and OK.
  4. Now restart your system and run Internet Explorer again.

Use Software Rendering instead of Graphics Rendering

Rendering here is defined as the process through which the browser accesses the graphics processor and speed-up the loading of images of the video and other graphics. There might be a possibility that Internet Explorer keeps crashing windows or any other operating system due to graphics rendering, and to fix you need to switch to software rendering in the Advanced Setting option, for which the steps are listed below:

  • Open Internet Explorer and select the Tool option.
  • From the tool menu, select the Internet Option.
  • A new window will open, from which you need to select the “Advance” tab.
  • Choose the Setting option, and under the Accelerated Graphics option, select Software Rendering.
  • Click “Apply” and then OK.

Run an Antivirus Scan in your System

Sometimes internet explorer keeps crashing because of malware or virus in the system. The virus present might corrupt the Internet Explorer files or, in any way, hinder the working of the browser or any other application in your system. For that, you need to have an Antivirus installed in your system. Once an antivirus is installed, run a quick scan to detect any malware that might infect your computer.

Check for Windows 10 Updates

Another possibility why Internet explorer keeps crashing in Windows 10 is that you might not have installed any update in your system. Follow the given steps to check for any updates in Windows 10:

  • Open settings in your system and press “window + I.”
  • Select “Check for updates” in the “update and security” in the settings option.
  • If case of any pending updates, install them.
  • After that, restart the computer and try to run Internet explorer again.

Disable Add-ons on Internet Explorer

Due to the presence of so many Add-ons, toolbars, and other browser objects, it is possible that your Internet browser keeps freezing. For that, you need to disable the Add-ons from Internet Explorer steps which are listed below:

  • Open Internet Explorer and then choose the “Tools” menu.
  • In the tools, choose “Manage Add-ons.”
  • From there, you can disable the Add-ons from the browser, due to which Internet Explorer keeps crashing on startup.
  • Now restart Internet Explorer and check for any issues.

If the issue persists, you must disable other Add-ons and check Internet explorer again.

Delete the Internet Explorer History

Follow the given steps to erase the Internet explorer browsing history
Open your browser and select the cogwheel icon on the upper right corner of the browser screen.
Select the history option from the list. Now the browser history will appear, from which you need to select the following options to clear all the history files:

  1. Temporary Internet Files
  2. Cookies and website data
  3. History, Password, Form data.
  4. Select all the options and select “Delete.”

Run System File Checker to fix Internet Explorer that Keeps Crashing

Due to the presence of corrupt files in your system, Internet Explorer will keep freezing or crashing. In order to resolve that issue, you need to run the system file scan from the command prompt steps, which are given below:

  • Launch the command prompt and ensure you have administrator-level privileges to make changes in your system.
  • Type sfc /scannow in the command prompt window, which will check and repair the corrupt or missing files in the system.
  • If any corrupt files are present which are related to Internet Explorer, then they will be repaired automatically.
  • Now restart the system and try to run Internet Explorer.

Restart the Internet Explorer by Task Manager

If you have opened so many internet explorer windows, then the Internet explorer keeps crashing. To fix that, you need to open the task manager and shut down all Internet Explorer in the running application.

Change your Browser

Internet Explorer was the first web browser that was able to make a large user base because of its various features and ease of use, which was far better than any other browser available at the time of its launch. However, with the passage and advancement of technology, the popularity of Internet explorer has been surpassed by various other applications like Google Chrome, Mozilla Firefox, and various others. So now it is time to change your browser and switch to another available ones. You can also update to Microsoft Edge.

Related Page: Certificate Error in Internet Explorer

Conclusion

From the above discussion, we hope that we have provided you with enough information regarding web browsers and why Internet Explorer keeps freezing while using the internet. In case you need any assistance regarding the internet or any other web browser, feel free to contact us at the given number below. You can also reach out to us using the Live chat option. We will definitely revert you with the provided solution.

Safari Not Working

Safari is a graphic web Browser for iPhone, iPad, and MacBook’s users. It has a few of the best features and is designed to be one of the most efficient browsers. But at times, the user faces apple safari browser not working problem. It generally happens due to setting issues. However, there are other reasons as well that are not so known. Luckily, there are different tips and tricks that you can follow to get your Safari not working & Safari Browser not working again or safari down today. So let’s understand every possible way that you can use to get your Safari Browser back on your Device.

Hunting for instant help to overcome Safari’s not working issue? Get in touch with the experts 1-855-357-4404, and they will assist you with the best guidance.

What Causes Safari is Not Working Issues?

There can be numerous reasons why your Safari Browser is not working properly & problems with safari. So before going further with the solution, you first need to know the reasons, a few of which are listed below:

  • Presence of a large number of Caches and Cookies.
  • If there is an outdated older plug-in in the browsers like Java or Flash.
  • Presence of Corrupted files.
  • Less or No storage available. 
  • Why can’t I login to my Safari account
  • Hindrance because of the Firewall or other security software.
  • If your Device has an older version of Safari.
  • Less or No RAM left.
  • Maybe your Device is attacked by some virus.
  • Installation of Faulty extensions in Safari
  • If you are accessing multiple tabs at a time. 
  • You may face issues with Safari due to ads or Pop-ups.
  • Third-party applications can create obstacles as well. 

Symptoms of Safari Not Working Problem.

If your Device is showing any of the above-mentioned conditions, then there is some problem with Safari stopped working or Can’t log into Safari.

  • Your Device freezes on its own when you are using Safari.
  • The Device is not taking your commands properly.
  • Web pages are not opening efficiently in Safari.
  • You are not able to switch the tabs quickly.
  • You are finding issues with audio and video as well.

Note: Before going further, check your Internet connection or Reset Your Network Settings Current problems and status. The Internet needs to be stable and strong to access the Safari Browser.

Methods to Troubleshoot Safari Browser Not Working

To troubleshoot Safari not working issue or Safari problems 2022-23, you can follow these methods:

Method 1 : Disable Safari Suggestion

If your Safari is not working on your iPhone & Why my Safari is not working or you are facing issues; like crashing, then you have to turn off the Safari Suggestions. This is the simplest and quickest way to resolve the issue; however, even we don’t know how this method fixes the problem. But users have found that this method helps them when they face the problem.

To disable the suggestion, you can follow the given instructions:

  1. Open the Settings app on your iPhone.
  2. Then Open Safari.
  3. Now turn on ‘Search Engine Suggestions.
  4. After that, turn off the Safari suggestions.

Method 2 : Verify your Cellular Settings for Safari.

If you are someone who has disabled cellular data access for the safari browser, then when you try to use Safari on mobile data or What happened to Safari, you will face an issue, and Safari won’t work. So to fix your problem, and delete the restrictions, follow these steps:

  1. Go to settings
  2. Then click on Cellular; here, you have to go down and look for Safari.
  3. Now enable Safari to give permission to use Cellular data.

And you can also disable Wi-Fi if you are using cellular data.

Method 3 : Modify the Screen Time Settings

If you have ever used Apple Screen Time settings for better digital control of your Device, then try to turn off these settings.

Note: Screen Time Settings for Safari is used to set the duration limit of any app, and once it is exceeded or Safari not working 2022-23, you can’t use that app for the day.

To turn it off, check the given instructions:

  1. Initially, open settings and go to the Screen Time option.
  2. Now on the next page, you need to click on the App limits.
  3. Then, you will find Safari in the list of options available. (If it is added to the list of apps with limited time)
  4. Click on it, and then select the Delete limit option.

Method 4 : Force Quit and Relaunch the Safari

If Safari Browser is not working on Mac or Safari issues today, then to resolve the issue, force quit it and then restart it again. To do so:

  1. Select the Apple logo first,
  2. Hit on the Force Quit option.
  3. Now choose Safari from the given list of Apps, and hit the Force Quit button.
  4. Now wait for a few moments and reopen Safari again.

By following this procedure your Safari Not Working on Mac Computer, problem will be fixed.

Method 5 : Delete the Safari Data

If you have been using Safari for a long time, then there will be a huge collection of website data, Cache & cookies. They can create issues for your Browser and slow it down. Thus, you must clear it out as soon as possible.

Note: It can create major issues if you have an iPhone with low storage capacity.

To clear the data:

  1. Go to the Settings app
  2. Now select Safari.
  3. Now, hit on the Clear History and Website Data. 

By this, you can remove all the browsing history available in your System, along with the saved password, stored Cache, and cookies.

Note: Do it frequently to eliminate any kind of working issue due to storage problems. 

Method 6 : Verify the Internet Connectivity.

Network connectivity is one of the major reasons for Safari not working today. So you must have to ensure that you are connected to a great network connection, and if needed, then rest your Network settings.

To do so:

  1. Go to the General option, available in the settings.
  2. Now click on Transfer or Reset iPhone.
  3. Hit on the Reset option, followed by selecting the Reset Network settings.

By this, your network will be reset, and your Safari Browser not working problem will be resolved. Now reopen Safari and use it without any problem.

Related Page: Safari Password Reset

Ending Note:

We hope that this post has guided you in fixing the Safari Not working problem. If you are still having any kind of problem with your Safari Browser, you can contact our Apple Safari experts. Feel free to speak with our professionals to get a permanent solution via email or live chat option. 

Safari Password Reset

Safari is a graphical browser developed for all Apple users. It stores your website login details, and in the future, they enter them for you automatically. But you can’t view these saved passwords using Safari, as the browser doesn’t give permission for this. If you want to view the password, then you have to use Apple’s Keychain Access application.
However, if you have Windows, then it is recommended to use a third-party application to review the password, as Apple doesn’t give you permission to recover passwords on Windows. Sometimes a user wants to reset the password due to privacy and security but doesn’t know the exact process. That’s why we are here to help you with the step-by-step guide to Safari Password Reset on your Mac device.

Want to learn about the reset Safari password process quickly? Call us our tollfree number and get in touch with professional experts who can assist you and guide you with the easiest method.

How to Reset Safari Password on Mac?

To reset or update the existing forgot Safari password & how to change Safari password, you have to follow the given steps:

  1. Go to the Dock and click on the Safari option.
  2. Now, navigate to the settings by selecting “Safari” from the menu bar.
  3. After that, click on the Preferences option from the drop-down menu.
  4. A new setting page will appear on your screen; there, you have to select the Password option.
  5. Now to access the already stored data, you have to provide your Mac’s user password.
  6. Next, you can see a list of website passwords saved on your Safari. You choose the website and hit on the “Details” option to modify the login credentials for the individual website.
  7. Thereafter, edit the username or password according to your requirement.
  8. Now, select Done to save the credentials.

Here you are done with the How do i change my Safari password & safari password reset process.

How to Recover Safari Passwords on a Window-Based Pc?

If you want to reset your Safari Password or change Safari password being a Windows user & How do i retrieve my Safari password, follow the given process, step by step as mentioned below:

  • To initiate the process, go to Nirsoft, and from there, you have to download WebBrowserPassView. Once the download process is complete, double-click on the downloaded EXE file to launch it.

Note: WebBrowserPassView shows all the passwords saved on your Safari Browser. You can read those passwords on your Windows or save those passwords in your system if needed.

  • Apart from that, you can also use SafariPasswordDecryptor, which is present in SecurityXploded. Download it and install it properly, and after that, open it and hit on the “Show Password” option to see your saved passwords. Now hit on the “Export to HTML” option in case you want to transfer the passwords to an HTML file.
  • Moreover, you can use XaviWare Software as well to recover your safari password. After installation, open Safari Password Recovery.

Note: You can only view two characters of each password in the free version. So, to view the whole password, you have to buy the paid version.

Steps to Delete the Saved Password on the Safari App

Go through the below-mentioned steps to delete the saved password on your Safari Browser.

  1. Begin the process by Viewing your Password.
  2. After that, click on the would like to delete option and select the Remove tab.

Note: If you want to delete multiple passwords, then press the command key and hold it, then click on the passwords you want to delete, and at last, hit on the Remove button.

Steps to Follow to Protect your Account and Password

If you are someone who is concerned about cybersecurity, then you must not save your password on a web browser. It is because if someone breaches your device, they can have all your account access and data. This can be used to steal your identity.

Follow the given steps to take care of your cybersecurity:

  1. Disable the Safari AutoFill features. To do so, open your Safari browser and go to the Safari preferences; from there you have to go to the Password option, then Unmark the Autofill Username and Passwords option.
  2. In addition to that, never save your password on any browser. It might seem inconvenient, but it can help you in saving the data breach.
  3. Moreover, use a Password manager like NordPass that will help you in saving all your passwords in one place and protect them with AES-256 encryption.
  4. At last, Remove your Password after getting it from the Safari browser. Delete that password so that no one can find the access.

Ending Note!!

With this, we hope that you have learned the way to Reset your Safari Password. However, if you need any further professional guidance, you can consult our experts. Email us your Queries at info@getcontacthelp.com, or if you want a quick solution, then you can also use a live chat option with Apple Safari anytime.

How to Download the Bitdefender Updates via Server?

Bitdefender antivirus is one of the best antiviruses all around the globe. It provides excellent protection services against malware, virus, spam, spyware, and so on. This antivirus is specially intended for business protection. It has features for security, central control, and the control for a workstation which are required for business protection. To get better protection features against malware, virus & cyber threats, you need to update the software. However, if you don’t know how to do it, then read this blog and grab the best way to Download the Bitdefender Updates via Server.

Resolution Steps to Fix Error with Downloading Bitdefender Updates

At times, users face various issues while downloading the updates of Bitdefender Antivirus. Thus to rectify that, you may follow the given troubleshooting steps:

  1. Initiate the process by launching the Bitdefender in your System.
  2. Next, you have to hit on the Update tab present at the left corner of your Screen.
  3. Here Bit defender will Check for any kind of updates present and then download them.
  4. Now, wait for sometime so that the Installation process will get complete.
  5. Note: This process can be a bit time taking as the speed of the download depends on the size of the update and the speed of your Internet Speed.
  6. Now, after installing, restart your System.

Apart from this, you can also install the Bitdefender update from its official website. To do so, look at the steps mentioned below:

  1. Open the Bitdefender Website and hit on the Support tab.
  2. Select “Downloads” from the dropdown menu.
  3. Select your Product from the list and Hit on the Download menu.
  4. Thereafter follow the on-screen prompt to complete the process.
  5. Once the update is installed perfectly, restart your System and make sure that it is working effectively to save your system from any kind of latest threats.

How to Update Bitdefender’s Threat Definitions Offline?

Below we have mentioned the procedure you can follow to update Bitdefender offline through Weekly Utility:

  • In the beginning, download the file corresponding to your Windows architecture from the link below and save it on your hard disk.
  • Follow these steps if you need help determining whether your computer is running a 32-bit or a 64-bit Windows.
    https://www.bitdefender.com/site/view/Desktop-Products-Updates.html 
  • Now, double-click the downloaded file ‘weekly.exe’ weekly.exe to start the setup wizard.
  • Next, you have to wait for a few moments while the antivirus signatures are being unpacked.

bitdefender-offline-update-unpacking

  • Moving ahead, select the radio button ‘I accept the agreement’ after you read and agree with the License Agreement.

bitdefender-offline-update-license-agreement

  • After that, click on the ‘Next’ tab.
  • Click ‘Install’ to begin installing the updates offline.

install-offline-updates

  • Please wait for Utility to update Bitdefender’s Threat Definitions.

updating-bitdefender-threat-definitions-offline

  • At last, end the process by clicking the ‘Finish’ button after completing the offline update process.

finish-bitdefender-offline-update

Drawing to a Conclusion!!

Here we are ending our blog, and we hope that you have collected ample information regarding the steps to Download the Bitdefender Antivirus Updates. In case you need any other additional help, you can contact our highly-skilled professionals through the live chat facility for a quick resolution. Apart from that, you can also dial our Toll-Free Number.

How to Fix Norton Error 8504 and 104 – A Step-by-Step Guide

Norton is a great antivirus, but the fact that should not be overlooked is that it has some hassles in terms of errors. Error 8504 and 104 are two common errors that appear at the same time and can create a major problem for your system.
The Error occurs when the Norton product is facing certain security issues or the installation of the program fails at the time of upgrade. In such a situation, you search for the best troubleshooting way, so that’s why we are here to help you with this blog to fix Norton Error 8504 & 104.

What are the Different Types of Norton Error 8504?

Below we have mentioned different types of Norton 8504 Errors faced by its users.

  • Norton Security Error 8504
  • Norton Security Error 8504 0
  • Norton 360 Security Error 8504 and 104
  • Norton Security Error 8504 5
  • Norton Security Error 8504 and 100
  • Norton Security Error Code 8504 101
  • Norton Security Error 8504 102
  • Norton Security Error 8504 106

Shortcoming that Provokes Norton Error 8504 and 104

Before knowing the ways to troubleshoot Norton Security Error 8504 and 104, let’s first understand the reasons that provoke such an error in your System.

  1. It might be possible that the Norton 360 software is not downloaded properly.
  2. You may have installed a corrupted file.
  3. You might have done something wrong while installing the software.
  4. There is some regulation in the Windows Registry that occurs mainly because of new Norton Software.
  5. The clash between some other antivirus and Norton Antivirus.
  6. Corruption in the windows files due to the presence of the virus.

Remedial Techniques to Fix Norton Error 8504 and 104

Now, let’s begin the discussion to resolve Norton Internet Security Error 8504 104 efficiently.

1st Method: Delete all the other Antivirus Present in your System

At times users face Norton 360 error 8504, 104 due to the presence of some other Antivirus software that creates a hindrance for you. Thus, to fix any issue due to that, follow the given steps:

  • In the beginning, Enable your System to check if there is some other Antivirus tool installed in your System.
  • In case you find one, uninstall it first, and then press Windows +R to open the Run box.
  • Enter appwiz.cpl in the search box, and hit the Enter button.

Windows +R

  • Now, you can see all the software installed in your System.
  • Here, you have to mark all the Antivirus Tools and uninstall them by following the On-screen Prompt.
  • Now restart your System, and check if the problem is fixed completely.

2nd Method: Utilization of the Norton Remove & Re-install Tool

Suppose the first Method won’t work for you, then try to use the Norton Remove and Re-install tool to fix the error 8504 and 104.

  • In the beginning, you have to Download the Norton Remove & Re-install tool.
  • Thereafter save that File in your System.
  • Moving ahead, you have to Double-click on the NRnR icon available on your Desktop or Download Folder.
  • Now, go through the License Agreement and select the Agree button.
  • Hit on the Advanced options, and click on Remove Only.

Advanced options

  • Select Remove, and then Restart your System.

3rd Method: Use the Disk Clean up

Another way to fix your issue is with the help of Disk Cleanup. To do so, you may check the steps mentioned:

  • Firstly, Switch on your System.
  • Next, hit the Start option, present at the bottom of your screen.
  • In the search box, enter Command.
  • A new Permission dialogue box will open in front of you; hit Yes.
  • Moving ahead, enter Cleanmgr, and hit enter button.

search box

  • After this, the Disc Manager will open in front of you, and the temporary files that might create errors will also be removed from your systems.

4th Method: Get an Updated Graphic Card

If the above-mentioned procedure is not much useful for you, then you can try to fix the issue by updating your Graphic card:

  • Begin the process by right-clicking on My Computer.
  • Next, go to the Manage option, and choose Device Manager.
  • Thereafter, Click on Display Adapters, or you might press the Windows+ R key to open the Run box.
  • Now enter “devmgmt.msc” and hit “Enter.”

Device Manager

  • Proceed further by double-clicking the Display Adapter option.
  • Next, you have to make sure to right-click on the HD Graphics Card option.
  • Here, choose the option to Update Driver Software.

Update Driver Software

  • Now look for the status of your HD Graphic Card, and find if it is updated or not by pressing Alt+ Enter.

Note: You can also do so by right-clicking and selecting.

Alt+ Enter

  • Here to check the status of the HD Graphics Card, by hitting ALT+ Enter. Verify if it is updated to the latest version or not.
  • At last, Restart the complete System.

Conclusion!

By following this blog, you can easily overcome Norton Error: “8504,104”. However, if you still find issues while dealing with this error, don’t panic. Instead, reach out to our professionals through live chat and resolve your issue within the shortest time possible.